Line Bot 串接 OpenAI API

最近很紅的ChatGPT,如果也能在Line上面使用的話,是不是感覺更方便呢?我們就來串接ChatGPT的開發公司OpenAI提供的API到Line Bot上吧!

這個範例會用Express起一個web server,建立一個method POST且path為/webhook的route作為line的webhook,用來接收line傳來的events

首先你需要先到 Line developers console 點選「Create a new channel」建立一個新的Channel,類型選擇「Messaging API」。填寫完成送出後進入Channel設定頁,複製最下方的「Channel secret」。回到上方選擇「Messaging API」頁籤,複製最下方的「Channel access token」。

用NPM安裝 openai, @line/bot-sdk, express,並在檔案中 require

Plain text
Copy to clipboard
Open code in new window
EnlighterJS 3 Syntax Highlighter
const { Configuration, OpenAIApi } = require('openai')
const line = require('@line/bot-sdk')
const express = require('express')
const { Configuration, OpenAIApi } = require('openai') const line = require('@line/bot-sdk') const express = require('express')
const { Configuration, OpenAIApi } = require('openai')
const line = require('@line/bot-sdk')
const express = require('express')

建立Line API需要的Config,將剛剛Line Channel的Token跟Secret填入,範例以環境變數帶入。

Plain text
Copy to clipboard
Open code in new window
EnlighterJS 3 Syntax Highlighter
// line config
const lineConfig = {
channelAccessToken: process.env.CHANNEL_ACCESS_TOKEN,
channelSecret: process.env.CHANNEL_SECRET
}
// line config const lineConfig = { channelAccessToken: process.env.CHANNEL_ACCESS_TOKEN, channelSecret: process.env.CHANNEL_SECRET }
// line config
const lineConfig = {
  channelAccessToken: process.env.CHANNEL_ACCESS_TOKEN,
  channelSecret: process.env.CHANNEL_SECRET
}

建立express,設定line bot所需的webhook路由以及訊息事件的handler。將程式碼上到主機上後,就可以繼續完成Line Bot的設定了。

Plain text
Copy to clipboard
Open code in new window
EnlighterJS 3 Syntax Highlighter
const app = express()
// line webhook
app.post('/webhook', line.middleware(lineConfig), (req, res) => {
Promise
.all(req.body.events.map(lineEventHandler))
.then((result) => res.json(result))
.catch((err) => {
console.error(err)
res.status(500).end()
})
})
// line message handler
function lineEventHandler (event) {
const lineClient = new line.Client(lineConfig)
return lineClient.replyMessage(event.replyToken, {
type: 'text',
text: 'Bot收到訊息囉'
})
}
app.listen(3000)
const app = express() // line webhook app.post('/webhook', line.middleware(lineConfig), (req, res) => { Promise .all(req.body.events.map(lineEventHandler)) .then((result) => res.json(result)) .catch((err) => { console.error(err) res.status(500).end() }) }) // line message handler function lineEventHandler (event) { const lineClient = new line.Client(lineConfig) return lineClient.replyMessage(event.replyToken, { type: 'text', text: 'Bot收到訊息囉' }) } app.listen(3000)
const app = express()

// line webhook
app.post('/webhook', line.middleware(lineConfig), (req, res) => {
  Promise
    .all(req.body.events.map(lineEventHandler))
    .then((result) => res.json(result))
    .catch((err) => {
      console.error(err)
      res.status(500).end()
    })
})

// line message handler
function lineEventHandler (event) {
  const lineClient = new line.Client(lineConfig)

  return lineClient.replyMessage(event.replyToken, {
    type: 'text',
    text: 'Bot收到訊息囉'
  })
}

app.listen(3000)

Line developers console 選取剛剛新增的Channel,點選「Messaging API」頁簽,在下方的「Webhook URL」點選「edit」,填入你的Webhook網址並按下「Update」,完成後按下「Verify」,就可以檢查webhook有沒有正常運作了。

接下來首先要到OpenAI 註冊你的帳號,註冊完後,到API Keys頁面,點選「Create new secret key」,複製API Key,回到程式碼,建立OpenAI API需要的Config填入剛剛的API Key,範例以環境變數帶入。

Plain text
Copy to clipboard
Open code in new window
EnlighterJS 3 Syntax Highlighter
const openAiConfig = new Configuration({
apiKey: process.env.OPENAI_API_KEY,
})
const openAiConfig = new Configuration({ apiKey: process.env.OPENAI_API_KEY, })
const openAiConfig = new Configuration({
  apiKey: process.env.OPENAI_API_KEY,
})

新增一個function負責傳遞訊息給OpenAI API,並等待回傳的訊息。

Plain text
Copy to clipboard
Open code in new window
EnlighterJS 3 Syntax Highlighter
async function askOpenAI (question) {
const openai = new OpenAIApi(openAiConfig)
// request
try {
// 使用text-davinci-003 model
// const completion = await openai.createCompletion({
// model: 'text-davinci-003', // 看你要使用哪個model: https://platform.openai.com/docs/models
// max_tokens: 100,
// prompt: question,
// temperature: 0.1 // 這是一個 0 - 1 的數值,越靠近1回答會更多樣性,越靠近0回答會更可靠
// })
// return completion.data.choices[0].text.replace(/^\n+/g, '')
// 使用gpt-3.5-turbo model (這個比較強)
const completion = await openai.createChatCompletion({
model: 'gpt-3.5-turbo',
messages: [{ role: 'user', content: question }]
})
return completion.data.choices[0].message.content.replace(/^\n+/g, '')
} catch (err) {
console.log(err)
return '抱歉我不知道'
}
}
async function askOpenAI (question) { const openai = new OpenAIApi(openAiConfig) // request try { // 使用text-davinci-003 model // const completion = await openai.createCompletion({ // model: 'text-davinci-003', // 看你要使用哪個model: https://platform.openai.com/docs/models // max_tokens: 100, // prompt: question, // temperature: 0.1 // 這是一個 0 - 1 的數值,越靠近1回答會更多樣性,越靠近0回答會更可靠 // }) // return completion.data.choices[0].text.replace(/^\n+/g, '') // 使用gpt-3.5-turbo model (這個比較強) const completion = await openai.createChatCompletion({ model: 'gpt-3.5-turbo', messages: [{ role: 'user', content: question }] }) return completion.data.choices[0].message.content.replace(/^\n+/g, '') } catch (err) { console.log(err) return '抱歉我不知道' } }
async function askOpenAI (question) {
  const openai = new OpenAIApi(openAiConfig)

  // request
  try {
    // 使用text-davinci-003 model
    // const completion = await openai.createCompletion({
    //   model: 'text-davinci-003', // 看你要使用哪個model: https://platform.openai.com/docs/models
    //   max_tokens: 100,
    //   prompt: question,
    //   temperature: 0.1 // 這是一個 0 - 1 的數值,越靠近1回答會更多樣性,越靠近0回答會更可靠
    // })
    // return completion.data.choices[0].text.replace(/^\n+/g, '')

    // 使用gpt-3.5-turbo model (這個比較強)
    const completion = await openai.createChatCompletion({
      model: 'gpt-3.5-turbo',
      messages: [{ role: 'user', content: question }]
    })
    return completion.data.choices[0].message.content.replace(/^\n+/g, '')
  } catch (err) {
    console.log(err)
    return '抱歉我不知道'
  }
}

將剛剛的Handler function改成這樣,注意function的前面有加上了 async

Plain text
Copy to clipboard
Open code in new window
EnlighterJS 3 Syntax Highlighter
async function lineEventHandler (event) {
const lineClient = new line.Client(lineConfig)
if (event.type !== 'message' || event.message.type !== 'text') {
return Promise.resolve(null)
}
const result = await askOpenAI(event.message.text)
// 將OpenAI回的訊息傳給使用者
return lineClient.replyMessage(event.replyToken, {
type: 'text',
text: result
})
}
async function lineEventHandler (event) { const lineClient = new line.Client(lineConfig) if (event.type !== 'message' || event.message.type !== 'text') { return Promise.resolve(null) } const result = await askOpenAI(event.message.text) // 將OpenAI回的訊息傳給使用者 return lineClient.replyMessage(event.replyToken, { type: 'text', text: result }) }
async function lineEventHandler (event) {
  const lineClient = new line.Client(lineConfig)

  if (event.type !== 'message' || event.message.type !== 'text') {
    return Promise.resolve(null)
  }

  const result = await askOpenAI(event.message.text)
  // 將OpenAI回的訊息傳給使用者
  return lineClient.replyMessage(event.replyToken, {
    type: 'text',
    text: result
  })
}

最後,因為我不想讓他每次都回我,尤其是如果將他加入群聊的時候,可能會很吵,因此我在Handler中再加入了一個判斷

Plain text
Copy to clipboard
Open code in new window
EnlighterJS 3 Syntax Highlighter
if (event.type !== 'message' || event.message.type !== 'text') {
return Promise.resolve(null)
}
// 改為
if (event.type !== 'message' || event.message.type !== 'text' || !event.message.text.includes('村長')) {
return Promise.resolve(null)
}
if (event.type !== 'message' || event.message.type !== 'text') { return Promise.resolve(null) } // 改為 if (event.type !== 'message' || event.message.type !== 'text' || !event.message.text.includes('村長')) { return Promise.resolve(null) }
  if (event.type !== 'message' || event.message.type !== 'text') {
    return Promise.resolve(null)
  }

// 改為

  if (event.type !== 'message' || event.message.type !== 'text' || !event.message.text.includes('村長')) {
    return Promise.resolve(null)
  }

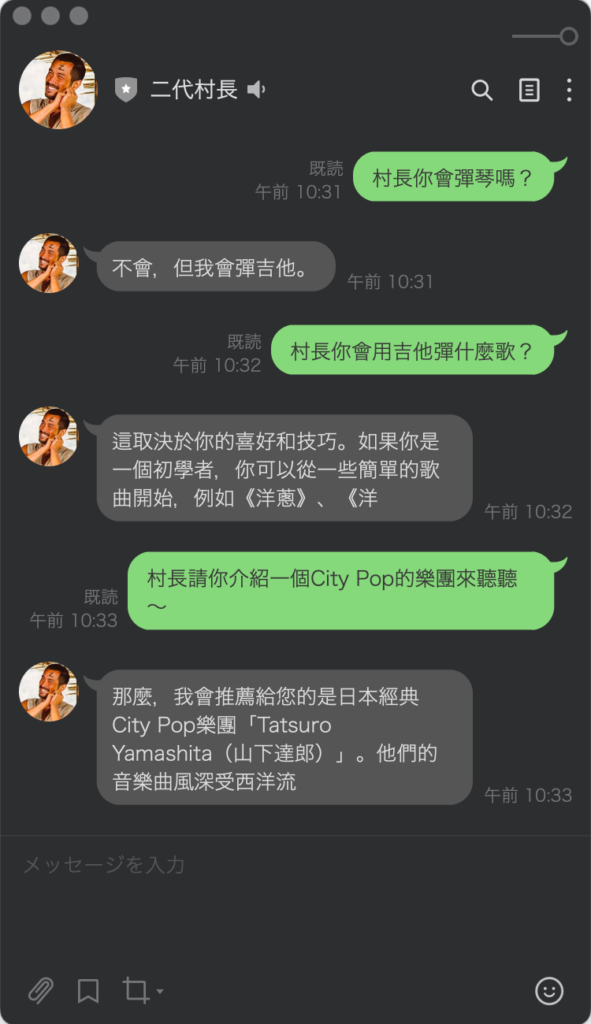
這樣子的話,就只有訊息中包含了村長兩個字時,才會將訊息傳給OpenAI等回應。
發佈留言

發佈留言必須填寫的電子郵件地址不會公開。 必填欄位標示為 *

這個網站採用 Akismet 服務減少垃圾留言。進一步了解 Akismet 如何處理網站訪客的留言資料